Sunday, January 26, 2025

How to Recondition 12V Batteries for More Power and Longer Life

How to Recondition 12V Batteries for More Power and Longer Life

How to Recondition 12V Batteries for More Power and Longer Life

12V batteries are the backbone of many essential devices, powering everything from cars and motorcycles to power tools and even your home's electrical system during an outage. However, like any other mechanical component, batteries degrade over time, losing their ability to hold a charge and deliver the power they once did. This decline in performance can be frustrating and expensive, as you may need to replace your batteries prematurely. But don't despair! There are proven methods to recondition 12V batteries, giving them a renewed lease on life and saving you money in the process.

Understanding Battery Degradation

Batteries are essentially chemical energy storage devices. Inside a lead-acid battery, the chemical reaction between lead plates and sulfuric acid generates electricity. Over time, this chemical process leads to several forms of degradation:

  • Sulfation: Lead sulfate crystals form on the battery plates, hindering the flow of electricity.
  • Corrosion: Internal components, like the plates and terminals, corrode, impeding the flow of current.
  • Sedimentation: Lead particles detach from the plates and settle at the bottom of the battery, reducing its capacity.
  • Loss of Electrolyte: The sulfuric acid solution, called electrolyte, can evaporate over time, weakening the battery's performance.

These factors result in reduced battery capacity, slower charging, and ultimately, a shorter lifespan. However, with proper care and reconditioning techniques, you can often reverse these processes and extend the life of your 12V batteries.

The Reconditioning Process

Battery reconditioning is a multi-step process aimed at restoring the battery's internal components to their optimal condition. The following steps are essential:

1. Assess the Battery's Condition

Before embarking on reconditioning, it's crucial to assess the battery's current state. This includes:

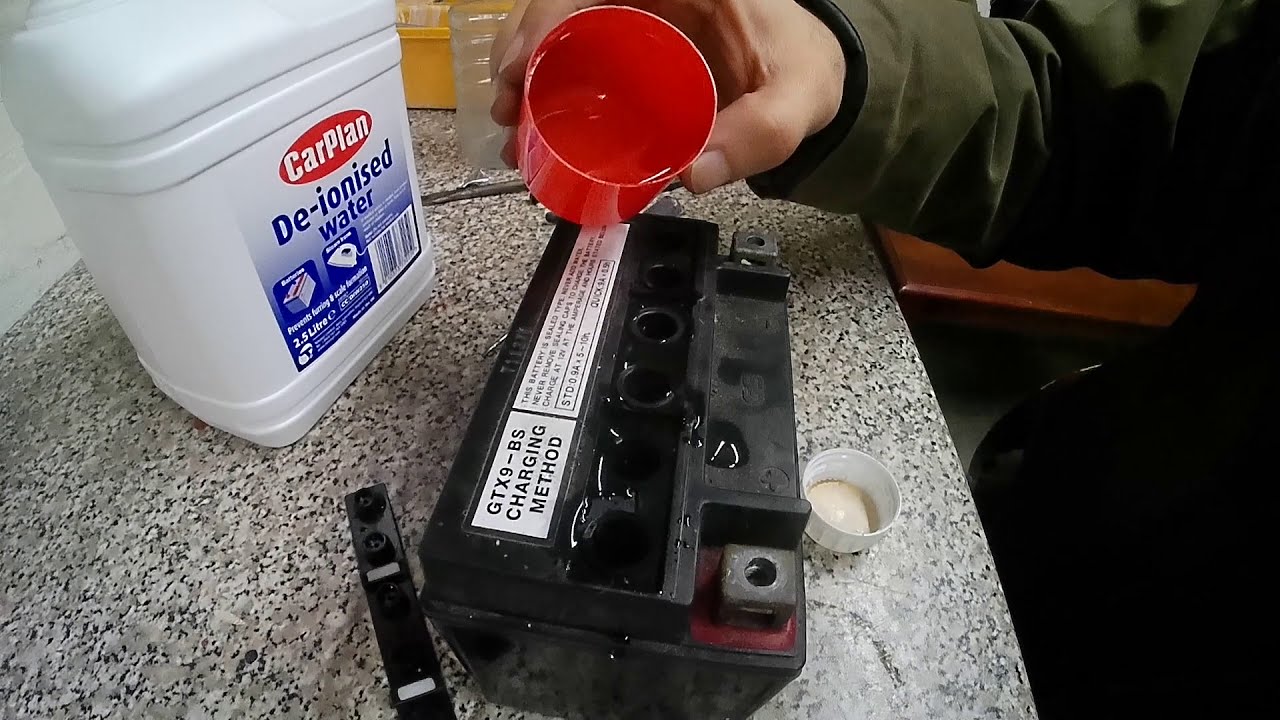
  • Checking the electrolyte level: Ensure the electrolyte level is within the recommended range. If it's too low, top it up with distilled water.
  • Measuring the battery's voltage: A fully charged 12V battery should have a voltage reading of around 12.6V. If it's significantly lower, it might indicate a severe problem that could be difficult to recondition.
  • Performing a load test: Connect a battery load tester to the battery and assess its ability to deliver power under a simulated load. This will reveal the battery's actual capacity and its ability to handle high current demands.

2. Charge the Battery

Once you've assessed the battery's condition, it's time for a thorough charging process. This step aims to remove sulfate buildup and replenish the battery's charge. Use a reputable battery charger with a low-amp mode. Follow these guidelines:

  • Set the charger to the appropriate mode: Choose a low-amp setting, typically 10-20% of the battery's amp-hour rating.
  • Charge the battery for 24-48 hours: Allow the battery to charge slowly and completely. This will help break down sulfation and restore the battery's capacity.
  • Monitor the battery's voltage: Ensure the voltage reaches its peak and remains stable, indicating a full charge.

3. Desulfation

Desulfation is a critical step in reconditioning. It involves breaking down the lead sulfate crystals that accumulate on the battery plates. You can achieve this through several methods:

  • Battery Desulfator: These devices generate specific frequencies that target and break down sulfate crystals.
  • Equalization Charging: This involves charging the battery at a high voltage (around 14.4V) for a short period. It can help break down sulfation but should be used with caution as it can potentially damage the battery.
  • Pulse Charging: This method involves sending pulses of current to the battery, which can effectively break down sulfation without the risk of overcharging.

4. Repeat the Charging Process

After desulfation, repeat the charging process mentioned earlier. This will ensure the battery is fully charged and the desulfation process is complete.

Important Considerations

Keep these points in mind for successful battery reconditioning:

  • Safety first: Always wear appropriate safety gear, like gloves and eye protection, when working with batteries.
  • Use distilled water: Only use distilled water when topping up the electrolyte. Tap water contains impurities that can damage the battery.
  • Avoid overcharging: Excessive charging can damage the battery. Monitor the voltage and charging time carefully.
  • Don't recondition severely damaged batteries: If the battery shows signs of significant damage, such as bulging or leaking, reconditioning might not be effective. It's best to replace it with a new one.
  • Regular maintenance is key: Even after reconditioning, regular maintenance, including periodic charging and checking the electrolyte level, is essential for prolonging battery life.

Conclusion

Reconditioning your 12V batteries can be a rewarding and cost-effective way to extend their lifespan. By following the steps outlined above, you can restore your batteries to a healthy state, giving you more power and longer-lasting performance. Remember, regular maintenance and proper care can significantly extend the life of your 12V batteries, saving you money and reducing waste. So, next time your battery starts to show signs of weakness, consider reconditioning it instead of replacing it.

Read More..

The Top Tools for Reconditioning NiCad Batteries at Home

The Top Tools for Reconditioning NiCad Batteries at Home

Top Tools for Reconditioning NiCad Batteries at Home

Nickel-cadmium (NiCad) batteries are rechargeable batteries that were once very popular due to their durability and ability to withstand high discharge rates. However, NiCad batteries have a shorter lifespan than other battery types and are prone to the "memory effect," which can reduce their capacity over time. While NiCad batteries are becoming less common, you may still encounter them in older devices or power tools. If you find yourself with a NiCad battery that has lost its charge, reconditioning it can help restore its capacity and extend its lifespan.

Reconditioning a NiCad battery involves a process of deep discharging and recharging the battery to remove the memory effect and restore its full capacity. This process can be done at home with a few simple tools and techniques. This article will delve into the best tools and techniques for reconditioning NiCad batteries.

Understanding NiCad Batteries and the Memory Effect

NiCad batteries work by using a chemical reaction between nickel oxide hydroxide and cadmium to generate an electrical current. During discharge, the chemical reaction produces cadmium hydroxide and nickel. When the battery is recharged, the process is reversed, restoring the nickel oxide hydroxide and cadmium.

The "memory effect" in NiCad batteries occurs when the battery is repeatedly partially charged before being fully discharged. This can lead to a build-up of cadmium hydroxide within the battery, which reduces the battery's capacity and can create a false sense of fullness. The battery may appear to be fully charged, but it will not be able to hold a full charge for long.

Tools for Reconditioning NiCad Batteries

Reconditioning NiCad batteries requires a few basic tools:

  • DC Power Supply: A DC power supply is the core component for reconditioning NiCad batteries. It provides a controlled and adjustable DC voltage output necessary for charging and discharging the battery. The power supply's voltage and current output should be appropriate for the battery's specifications.
  • Multimeter: A multimeter is essential for monitoring the battery's voltage and current during the reconditioning process. It allows you to track the charging and discharging cycles accurately. A multimeter with a DC voltage and current measurement function is necessary.
  • Resistor: A resistor is used to create a load for discharging the battery. The resistor's value should be chosen to discharge the battery at a safe rate. The proper resistance value depends on the battery's capacity and the desired discharge current.
  • Alligator Clips: Alligator clips help connect the battery to the power supply and the resistor safely and securely. They make it easier to connect the components and ensure a good electrical connection.
  • Safety Gear: Safety gear, such as eye protection, gloves, and a fire extinguisher, should always be used when working with electricity.

Selecting the Right Tools

When choosing the right tools, consider the following factors:

  • Battery Capacity: The battery's capacity determines the required charging current and discharge time. A higher capacity battery requires a higher charging current and a longer discharge time.
  • Battery Voltage: The battery's voltage determines the voltage output required from the DC power supply.
  • Discharge Current: The discharge current should be a safe rate for the battery. A too-high discharge current can damage the battery.

Reconditioning Process

Reconditioning a NiCad battery involves a series of steps:

  1. Prepare the Battery: Before beginning the reconditioning process, ensure the battery is fully discharged. Connect the battery to the resistor and allow it to discharge until the voltage drops below 1 volt.
  2. Deep Discharge: Connect the battery to the DC power supply with the positive terminal of the battery connected to the positive terminal of the power supply and the negative terminal of the battery connected to the negative terminal of the power supply. Set the power supply to a low voltage, such as 1 volt, and allow the battery to discharge completely for at least 12 hours.
  3. Charging: After the deep discharge, connect the battery to the DC power supply in the same way as before. Set the power supply to the battery's recommended charging voltage. You can find the recommended voltage on the battery's label or in its documentation. Charge the battery for at least 12 hours. During charging, monitor the current using the multimeter. If the current drops significantly, the battery may be fully charged.
  4. Cycle Repetition: Repeat the deep discharge and charging steps at least three times to fully recondition the battery. This will help ensure the battery's full capacity is restored.

Important Notes

  • Battery Safety: During the reconditioning process, carefully monitor the battery temperature. If it gets excessively hot, stop the process immediately. Overheating can damage the battery.
  • Ventilation: Work in a well-ventilated area as reconditioning batteries may release fumes or gases.
  • Caution: Always use caution when working with electricity. Disconnect the battery from the power supply before making any connections or disconnections.
  • Not a Guarantee: Reconditioning a NiCad battery does not guarantee it will return to its original capacity. Some batteries may be too damaged to be reconditioned.

Conclusion

Reconditioning NiCad batteries can be a valuable way to extend their lifespan. By understanding the process and using the right tools, you can restore the capacity of older batteries and continue using them for your devices. While reconditioning can help restore some lost capacity, it's important to remember that NiCad batteries are older technology. If you're considering using NiCad batteries for critical applications, it's wise to evaluate the risks involved and consider alternative, more modern battery technologies.

Read More..

How to Recondition a 12V Battery to Boost Its Power

How to Recondition a 12V Battery to Boost Its Power

How to Recondition a 12V Battery to Boost Its Power: A DIY Guide

Alright, so your car battery is starting to act up, and you're thinking about replacing it. But hold on! Before you go dropping a bunch of cash on a new battery, there's a chance you can bring your old one back to life. Reconditioning a 12V battery isn't as complicated as it sounds. With a bit of time, some patience, and a few simple tools, you might be able to breathe new life into your trusty battery and save yourself some money.

Now, I'm not saying this will work miracles. If your battery is completely dead or has been sitting around for years, chances are it's beyond saving. But for a battery that's just starting to show its age, reconditioning can be a worthwhile option.

Let's dive in and explore how to bring that tired battery back to life!

Understanding Battery Reconditioning

First things first, let's clear up what battery reconditioning actually is. Think of it as a sort of "detox" for your battery. Over time, battery plates get covered in a buildup of sulfation â€" a hard, white crust that stops the battery from efficiently storing and delivering power. Reconditioning essentially involves breaking down this sulfation and restoring the battery's capacity.

Why Bother Reconditioning?

You might be asking, "Why bother with all this hassle? Just buy a new battery!" And you'd be right, it's the simplest solution. But here's why reconditioning is worth considering:

  • Cost-Effective: Replacing a battery can be expensive. Reconditioning offers a much cheaper alternative, especially if you're just dealing with a minor performance issue.
  • Environmentally Friendly: You're giving your old battery a second life instead of sending it to a landfill.
  • Learning Experience: It's a rewarding DIY project that can teach you about how batteries work.

Assessing Your Battery

Before you jump into reconditioning, it's crucial to assess your battery's condition. Not all batteries are good candidates for reconditioning. Here's a quick checklist:

  • Physical Damage: Check for any cracks, leaks, or corrosion. A damaged battery is likely beyond repair.
  • Age: A battery over 5 years old is pushing its luck. The older it is, the less likely reconditioning will succeed.
  • Battery Voltage: Use a voltmeter to check the battery's resting voltage. A healthy battery should read around 12.6 volts. Anything significantly lower (11.5 volts or less) is a bad sign.

Safety Precautions

Battery acid is a serious hazard, so always prioritize safety:

  • Wear protective gear: Gloves, eye protection, and old clothes are essential.
  • Work in a well-ventilated area: Battery acid fumes can be harmful.
  • Never smoke or use open flames near a battery.
  • Keep children and pets away.

The Reconditioning Process

Ready to tackle the reconditioning process? Here's a step-by-step guide:

1. Disconnect the Battery

Start by disconnecting the battery cables. Always disconnect the negative (black) cable first, and connect it last when reconnecting. This prevents sparks that could cause damage.

2. Clean the Battery Terminals

Use a wire brush or a baking soda paste to remove any corrosion buildup from the battery terminals and posts. This will ensure a good connection during charging.

3. Equalize the Battery

This step involves slowly charging the battery at a low amperage for a prolonged period. The aim is to gently loosen the sulfation on the battery plates. You can do this with a battery charger set to a "low amp" or "trickle charge" setting. Charge for 24-48 hours, monitoring the battery's temperature. If it gets too hot, stop and let it cool down.

4. Desulfation

This is the crucial step where you really try to break down the sulfation. Here are a couple of methods:

  • Battery Desulfation Device: These devices are specifically designed to send low-frequency pulses through the battery, which can help to break down the sulfation. They can be purchased online or at some automotive stores.
  • Homemade "Pulse Charger": You can create a simple pulse charger by using a DC power supply and a resistor. However, this method requires some electrical knowledge and is less reliable than using a dedicated desulfation device.

The desulfation process can take several hours, even up to a few days depending on the severity of the sulfation.

5. Recharge the Battery

After the desulfation process, give the battery a full recharge using your regular battery charger. Make sure the charger is rated for your battery type and that it's set to the appropriate charging current.

6. Test the Battery

Once the battery is fully charged, use a voltmeter to check its voltage. A healthy battery should read around 12.6 volts. If it reads lower, it might need further reconditioning or replacement. You can also test the battery's cranking power using a battery load tester. This will give you a more accurate indication of the battery's health.

Important Tips

Keep these tips in mind for the best chance of success:

  • Start with a Clean Battery: A clean battery will allow for better conductivity and help the reconditioning process.
  • Don't Overcharge: Overcharging can damage the battery. Monitor the charging process and follow the manufacturer's recommendations.
  • Be Patient: Reconditioning takes time. Don't expect instant results.
  • Use a Reliable Charger: A good charger is crucial for effective reconditioning.
  • Don't Give Up Too Soon: Sometimes it takes a few cycles of reconditioning to see significant improvement.

Conclusion

Reconditioning a 12V battery isn't a guarantee, but it's a worthwhile attempt if you're looking for a cost-effective way to extend the life of your old battery. Just remember to prioritize safety and be patient. With some effort, you might be able to breathe new life into your old battery and save yourself a trip to the auto parts store!

Read More..

How to Recondition Old Batteries for Better Charging Capacity

How to Recondition Old Batteries for Better Charging Capacity

Reviving Your Old Batteries: A Guide to Boosting Charging Capacity

Hey there, battery enthusiasts! Let's face it, those old batteries we have lying around can be a real pain. They lose their charge faster than a goldfish with a memory problem, and it feels like we're constantly struggling to keep them alive. But before you toss them in the recycling bin, hold on! There's a chance to give those old batteries a second life. It's time to get hands-on and learn the secrets to reconditioning them.

Understanding the Battery Lifecycle

Think of a battery like a car. With every use, it wears down. Tiny crystals form inside, making it harder for the battery to hold a charge. This is called "sulfation," and it's the main reason your batteries start to act up.

But don't despair! Just like a car, batteries can be revitalized with a little TLC. By understanding the different types of batteries and their unique needs, we can give them a fighting chance to regain their former glory.

The Art of Reconditioning: Different Types, Different Approaches

Now, let's dive into the specifics. Batteries come in various flavors, each requiring a specific approach to reconditioning.

Lead-Acid Batteries: The Workhorses

Lead-acid batteries are the most common type, found in cars, motorcycles, and even some power backup systems. Here's how to tackle them:

  1. Clean Up: Dust off the terminals and make sure they're shiny and free of corrosion. A wire brush or baking soda paste can work wonders.
  2. Give Them a Charge: Use a battery charger designed for lead-acid batteries. Start with a low charge rate, and slowly increase it as the battery starts to accept more power. Don't rush this process, as it could damage the battery.
  3. The "Equalization Charge": After a full charge, give the battery a longer, slower charge at a higher rate. This helps break down sulfation and brings the battery back to its optimal state.
  4. The "Desulfation" Technique: For stubborn batteries, there's a more aggressive approach. You can try a desulfation charger, which pulses high-frequency current into the battery to dissolve the sulfate crystals. Be cautious with this method, as it can potentially damage the battery if not used properly.

Lithium-Ion Batteries: The Modern Marvels

Lithium-ion batteries power our phones, laptops, and electric vehicles. They're more sensitive than lead-acid batteries, so reconditioning them requires a bit more finesse:

  1. Calibrate: Fully drain the battery, then charge it to 100% and let it sit for a few hours. This "calibration" helps the battery learn its new capacity.
  2. Avoid Deep Discharges: Lithium-ion batteries don't like being completely drained. Try to keep them topped up as much as possible to prevent unnecessary stress.
  3. Store Them Wisely: When storing lithium-ion batteries, aim for a 40-50% charge level and store them in a cool, dry place. This slows down degradation.
  4. Consider Battery Management Systems (BMS): Some lithium-ion batteries have BMS systems that help monitor and manage their health. If you're dealing with a more complex battery system, consult the manufacturer's guidelines for best practices.

Safety First: Tips for Handling Batteries

Remember, batteries can be dangerous if handled improperly. Here are some crucial safety tips to keep in mind:

  1. Wear safety goggles and gloves: Batteries can release corrosive acid or fumes.
  2. Work in a well-ventilated area: Avoid inhaling fumes from batteries.
  3. Don't mix different battery types: This can lead to dangerous chemical reactions.
  4. Use the correct charger: Using the wrong charger can damage the battery and even cause a fire hazard.

The Bottom Line: Can You Really Recondition Old Batteries?

Reconditioning batteries is a bit like playing with fire. While it might seem like magic, the truth is that you can't completely reverse the aging process. You can, however, improve their performance and extend their lifespan. Think of it as giving them a second wind.

Before attempting reconditioning, consider the battery's age, how much it's been used, and the level of sulfation. If it's showing serious signs of wear and tear, it's probably time to say goodbye and get a new one. But if you're willing to put in the effort, you might just breathe new life into your old batteries and save yourself some money.

Read More..

How to Recondition Lead-Acid Batteries for Better Performance

How to Recondition Lead-Acid Batteries for Better Performance

Reconditioning Lead-Acid Batteries for Enhanced Performance

Lead-acid batteries, ubiquitous in various applications from automotive to backup power systems, are susceptible to degradation over time. As the battery ages, its capacity diminishes, resulting in reduced performance and potentially premature failure. However, reconditioning these batteries can effectively rejuvenate their performance, extending their lifespan and offering significant cost savings.

This comprehensive guide delves into the intricacies of reconditioning lead-acid batteries, providing a detailed understanding of the process, its benefits, and the crucial steps involved.

Understanding Battery Degradation and Reconditioning

The primary reason for battery degradation is the formation of lead sulfate crystals on the battery plates, hindering the flow of electrical current. This process, known as sulfation, occurs naturally during battery discharge and recharge cycles. As the battery ages, these crystals become larger and harder, reducing the surface area available for chemical reactions.

Reconditioning essentially involves reversing this sulfation process. By applying specific techniques, we can break down these lead sulfate crystals and restore the battery's capacity.

Benefits of Reconditioning Lead-Acid Batteries

Reconditioning offers numerous advantages, including:

  • Extended Battery Lifespan: Reconditioning can significantly extend the operational life of a battery, delaying the need for replacement.
  • Improved Performance: Reconditioned batteries can regain a substantial portion of their original capacity, delivering enhanced performance.
  • Cost Savings: The cost of reconditioning is significantly lower than purchasing a new battery, resulting in considerable financial savings.
  • Reduced Environmental Impact: By extending the lifespan of existing batteries, reconditioning contributes to a more sustainable approach to battery management, reducing the need for new battery production.

The Reconditioning Process: A Step-by-Step Guide

Reconditioning involves a series of steps designed to break down sulfation and restore battery functionality. Here's a detailed breakdown of the process:

1. Battery Assessment and Preparation

The first step is a thorough assessment of the battery's condition. This involves checking:

  • Voltage: Using a voltmeter, measure the battery's open-circuit voltage. A healthy battery should read around 12.6 volts.
  • Specific Gravity: This measures the concentration of electrolyte within the battery. Use a hydrometer to measure specific gravity, which should be within the manufacturer's specified range.
  • Visual Inspection: Look for any signs of damage, corrosion, or leaking electrolyte.

If the battery has visible damage or severe corrosion, it's best to discard it. For batteries with minor damage, a careful cleaning with baking soda and water can be beneficial.

2. Desulfation

Desulfation is the core of the reconditioning process. It involves applying a specific charging method to break down the lead sulfate crystals. This can be achieved through:

  • Pulse Charging: This technique involves applying a series of short, high-current pulses to the battery. These pulses disrupt the crystal structure of lead sulfate, allowing it to dissolve.
  • Equalization Charging: This method involves charging the battery at a high voltage and current for an extended period. This can be effective, but it can also generate excessive heat, so careful monitoring is essential.
  • Desulfation Equipment: Specialized desulfation equipment is available that employs specific techniques to break down sulfation more effectively. These devices often use high-frequency pulses or other methods.

3. Battery Charging

After desulfation, the battery needs to be fully charged. This step replenishes the electrolyte and ensures optimal performance.

Use a dedicated battery charger that provides a constant current charging method, allowing the battery to reach full charge without overcharging.

4. Battery Testing and Validation

Once the battery is fully charged, it's essential to test its performance. This can be done by:

  • Load Testing: Apply a specific load to the battery and measure its voltage and current output. This test assesses the battery's ability to deliver power under load.
  • Capacity Testing: This measures the battery's ability to hold a charge. It involves discharging the battery at a specific rate and recording the time it takes to reach a certain voltage level.

Based on the test results, you can determine if the reconditioning process was successful. If the battery's performance meets your requirements, it's ready for use. If not, further desulfation or other interventions might be necessary.

Precautions and Safety Considerations

Reconditioning lead-acid batteries requires careful attention to safety. Here are some crucial precautions:

  • Ventilation: Reconditioning processes often involve the release of hydrogen gas. Ensure proper ventilation during charging and desulfation to prevent accumulation of flammable gases.
  • Eye and Skin Protection: Wear appropriate eye protection and gloves to avoid contact with battery acid. Battery acid is highly corrosive and can cause severe burns.
  • Fire Prevention: Be cautious of potential sparks or heat generation during reconditioning. Keep fire extinguishers readily available.
  • Proper Equipment: Use only battery chargers and desulfation equipment designed for lead-acid batteries. Improper equipment can damage the battery or pose safety hazards.

Conclusion

Reconditioning lead-acid batteries can be an effective way to extend their lifespan, improve their performance, and save money. By understanding the process, following the recommended steps, and prioritizing safety, you can successfully restore your batteries to a more functional state. However, it's important to acknowledge that not all batteries are suitable for reconditioning. Batteries with significant damage, severe sulfation, or other internal issues may not respond well to the process.

Ultimately, reconditioning offers a viable option for revitalizing lead-acid batteries, minimizing waste, and maximizing their utility.

Read More..

How to Safely Restore Lead-Acid Batteries Without Special Equipment

How to Safely Restore Lead-Acid Batteries Without Special Equipment

How to Safely Restore Lead-Acid Batteries Without Special Equipment

Hey there, battery enthusiast! You know that feeling, right? Your trusty lead-acid battery is starting to lose its juice, and you're faced with the dreaded decision: replace it or try to bring it back to life?

Don't worry, you're not alone! Many people have successfully revived their lead-acid batteries without fancy equipment. We're going to walk through a safe and effective method to get those batteries humming again. Just remember, safety first! We'll cover everything you need to know, from understanding the process to taking precautions.

Understanding the Basics

Let's start by understanding how lead-acid batteries work. They consist of lead plates submerged in an electrolyte solution (sulfuric acid and water). When you discharge a battery, lead sulfate forms on the plates, reducing the battery's capacity. But hold on, here's the good news: the process is reversible!

By applying a reverse current (charging), we can break down the lead sulfate and restore the battery's capacity. That's the magic behind restoring your battery.

Safety First!

Before we dive into the restoration process, safety is paramount. Lead-acid batteries contain sulfuric acid, a corrosive substance. Here are some essential precautions:

  • Always wear protective gear, including gloves, goggles, and a face mask.
  • Work in a well-ventilated area. Sulfuric acid fumes can be harmful.
  • Never mix the electrolyte solution yourself. Use pre-mixed battery acid.
  • Keep children and pets away from the work area.
  • Have baking soda on hand for neutralizing acid spills.

Gathering Your Supplies

To restore your battery without fancy equipment, you'll need a few basic items:

  • A Battery Charger: A standard car battery charger will do the trick. It's essential to use a charger specifically designed for lead-acid batteries.
  • Distilled Water: Distilled water is crucial because it doesn't contain impurities that can damage the battery.
  • Hydrometer: This handy tool measures the specific gravity of the electrolyte solution, which indicates the battery's charge level.
  • Rubber Gloves and Goggles: Protection is key! Always wear gloves and goggles when handling battery acid.
  • Baking Soda: For neutralizing acid spills.
  • A Clean Container: To mix distilled water and acid if needed.

The Restoration Process

Now, let's dive into the restoration process, step by step:

1. Inspect Your Battery

Before you begin, take a good look at your battery. Check for any signs of damage, leaks, or corrosion. If you see any significant issues, it's best to replace the battery.

2. Clean the Battery Terminals

Clean the battery terminals using a wire brush or sandpaper. This will ensure a good electrical connection during charging.

3. Check the Electrolyte Level

Carefully remove the battery caps and check the electrolyte level in each cell. The electrolyte should cover the plates by about half an inch. If the level is low, add distilled water to each cell until it reaches the appropriate level.

4. Charge the Battery

Connect your battery charger to the battery, observing the polarity (red to positive, black to negative). Set the charger to the appropriate amperage for your battery type (consult your battery manual or charger instructions).

It's crucial to charge the battery slowly and allow it to charge for at least 24 hours, or longer depending on the battery's condition. Never attempt to "fast charge" a battery.

5. Monitor the Charging Process

While the battery is charging, monitor its progress. If the charger's indicator light turns green or the voltage reading stabilizes, it indicates that the battery is fully charged.

6. Check the Specific Gravity

Once the battery is fully charged, use a hydrometer to check the specific gravity of the electrolyte solution in each cell. The specific gravity reading should be within the range specified for your battery type.

7. Repeat the Process if Necessary

If the battery's specific gravity readings are consistently low even after a full charge, the battery may be damaged and may require replacement. However, if the readings improve, you can repeat the charging process a few times to further restore the battery's capacity.

Tips for Success

Here are a few tips to increase your chances of success when restoring a lead-acid battery:

  • Slow and Steady Wins the Race: Always charge the battery slowly. Fast charging can damage the battery.
  • Don't Overcharge: Leaving the battery on the charger for extended periods beyond its full charge can also damage it.
  • Regular Maintenance: Once the battery is restored, maintain its health by regularly checking the electrolyte level and topping it off with distilled water if needed.
  • Consider Replacing: If you're not comfortable working with lead-acid batteries or if the battery is significantly damaged, it's best to replace it.

Important Considerations

Before embarking on this journey, remember these important considerations:

  • Battery Age: Batteries have a lifespan. Restoring an older battery might only provide temporary relief.
  • Deep Discharge: If the battery has been deeply discharged multiple times, it might be beyond restoration.
  • Safety is Non-Negotiable: Lead-acid batteries can be hazardous. Always prioritize safety and follow proper handling procedures.

There you have it! By understanding the process, prioritizing safety, and taking your time, you can potentially breathe new life into your lead-acid battery. Good luck!

Read More..

How to Restore a Battery for Off-Grid Energy Systems

How to Restore a Battery for Off-Grid Energy Systems

Restoring Your Off-Grid Battery Powerhouse: A Guide to Second Life

Living off-grid is a thrilling adventure, a commitment to self-reliance and a connection to nature. But it also comes with its own set of challenges, and one of the biggest is managing your battery bank. Over time, even the most robust batteries lose their punch, delivering less power and requiring more frequent charging. But before you throw in the towel and buy brand new batteries, there's a chance to breathe life back into your old ones: battery restoration.

Restoring batteries isn't a magic cure-all, but it can extend their lifespan and get you back to enjoying reliable power. It's like giving your trusty workhorse a well-deserved tune-up. But, like any DIY project, it’s important to understand what you’re doing and to take necessary safety precautions. Let’s dive into the world of battery restoration and see what we can uncover.

Understanding Battery Chemistry: The Basics

To understand battery restoration, we need to understand how batteries work. Most off-grid systems use deep-cycle lead-acid batteries. These batteries store energy through a chemical reaction involving lead plates immersed in an electrolyte solution (usually sulfuric acid and water). During discharge, the lead plates undergo a chemical transformation, releasing energy as electricity. Charging reverses the process, restoring the plates to their original state.

Over time, the lead plates can become sulphated, forming a hard, crystalline layer that hinders the chemical reaction. This reduces the battery's capacity and its ability to accept and deliver charge. Other issues like internal resistance, corrosion, and electrolyte loss can also contribute to a decline in performance.

The Art of Battery Restoration: Strategies for a Second Life

Battery restoration is a bit like a delicate dance, balancing the needs of the battery with your goals. Here are some common techniques that can help bring your batteries back to life.

Desulphation: Breaking Up the Crystals

Desulphation is the process of removing the sulphate crystals from the lead plates. It’s often the cornerstone of battery restoration. Several methods can be employed:

  • Pulse Charging: This technique involves applying short bursts of high-current pulses to the battery. The pulses help break down the sulphate crystals. Several commercial desulphation devices employ this method.
  • Equalization Charging: A controlled high-voltage charge for a prolonged period, often several hours. This can help break down some sulphate build-up and remove excess water from the battery.
  • Battery Equalizer: These devices monitor and control battery charging, ensuring each cell is fully charged and preventing overcharging. While not a direct desulphation method, they can help minimize future sulphate formation.

Electrolyte Correction: Replenishing the Life Force

Over time, batteries can lose electrolyte through evaporation or internal leakage. Replenishing the electrolyte is crucial for restoring proper function. But it's important to use the right type and quantity of electrolyte. You can:

  • Distilled Water: For most lead-acid batteries, distilled water is the primary electrolyte component. Add distilled water until the electrolyte level reaches the appropriate mark on the battery's side.
  • Battery Acid: In some cases, adding a small amount of battery acid (sulfuric acid) might be necessary to bring the electrolyte to the correct concentration. But proceed with caution as adding too much acid can be dangerous.
  • Consult the Battery Manual: Always refer to the battery manufacturer’s instructions for electrolyte replenishment. They'll provide specific guidance for your battery type.

Cleaning and Maintenance: Keep Things Tidy

A clean battery is a happy battery. Regular maintenance can prevent problems and extend the life of your batteries:

  • Clean the Battery Terminals: Corrosion on battery terminals can hinder the flow of electricity. Use a wire brush or a terminal cleaning tool to remove corrosion and ensure a good connection.
  • Inspect for Leaks: Check the battery for any leaks or signs of damage. If you see any leakage, it’s best to isolate and address the issue.
  • Monitor Battery Temperature: Keep your batteries in a cool, well-ventilated area. Excessive heat can damage batteries.

Choosing the Right Restoration Method: Matching the Approach to the Need

Not all batteries are created equal, and not all restoration techniques are equally effective. The right approach depends on the battery's age, condition, and the level of restoration you seek:

  • New Batteries: Restoring brand-new batteries isn’t usually necessary. Focus on proper charging and maintenance to maximize their life.
  • Slightly Used Batteries: These batteries can benefit from a simple equalization charge to maintain their performance.
  • Older Batteries: If your batteries are showing signs of age, like reduced capacity or slow charging, more intensive methods like pulse charging or desulphation may be required.
  • Deeply Discharged Batteries: For batteries that have been deeply discharged for an extended period, restoration can be more challenging and might not be successful.

Safety First: Handling Batteries with Care

Battery restoration involves working with powerful chemicals and electricity. Never take safety lightly. Here are some essential precautions to keep in mind:

  • Wear Protective Gear: Always wear eye protection, gloves, and a face mask to avoid contact with the battery acid.
  • Ventilate the Area: Battery acid fumes are toxic. Ensure adequate ventilation to avoid inhaling them.
  • Disconnect Batteries Before Working: Always disconnect the battery terminals from the circuit before performing any maintenance or restoration procedures.
  • Handle with Care: Lead-acid batteries are heavy. Use proper lifting techniques to avoid injury.
  • Neutralize Spills Immediately: If battery acid spills, neutralize it with baking soda. Dispose of the neutralized mixture according to local regulations.

Restoring Your Battery Bank: A Journey of Perseverance

Battery restoration can be a rewarding experience, giving your off-grid system a second lease on life. But it requires time, patience, and a bit of technical know-how. It’s a journey that might not always be smooth, but the satisfaction of extending the lifespan of your batteries and keeping your off-grid dream alive can be well worth the effort.

Remember, proper battery maintenance and regular inspections are key to preventing major issues and maximizing the life of your battery bank. By being proactive and attentive, you can keep your off-grid energy system running smoothly and reliably for years to come. Now go forth, explore the world of battery restoration, and power your off-grid adventure with renewed energy!

Read More..